Underwater Camera – Wrist Leash

I recently posted about overhauling a second hand Ikelite underwater camera housing. It was a relatively straightforward job, fiddly at times, but enjoyable. Before I took the housing in the ocean, I wanted to make a custom leash so I could secure the camera to my wrist.

The main purpose of the leash is to prevent the camera floating off (either downwards into a deep abyss or upwards to the surface) if I have to let go of it to use both my hands (or I accidentally let go). However, equally important is that it must be straightforward to release the camera if the situation arises such as a tangle.

So, I set out to make myself a custom leash that was:

  • Cheap to make
  • Materials used can be immersed in salt water
  • Easy to separate myself from the leash
  • Bright colour so it can be easily seen

I started out by taking a walk through Bunnings to see if there was some sort of pre-made leash I could buy. If not, I was thinking about some sort of plastic rope or webbing.

I didn’t find a pre-made leash, but I got looking at the polyester webbing. 10m of 25mm wide plastic webbing was reasonably cheap, but what surprised me was the vast array of different connectors and accessories to suit the polyester webbing, and they were all really cheap. Like a few dollars per packet.

25mm polyester webbing and accessories

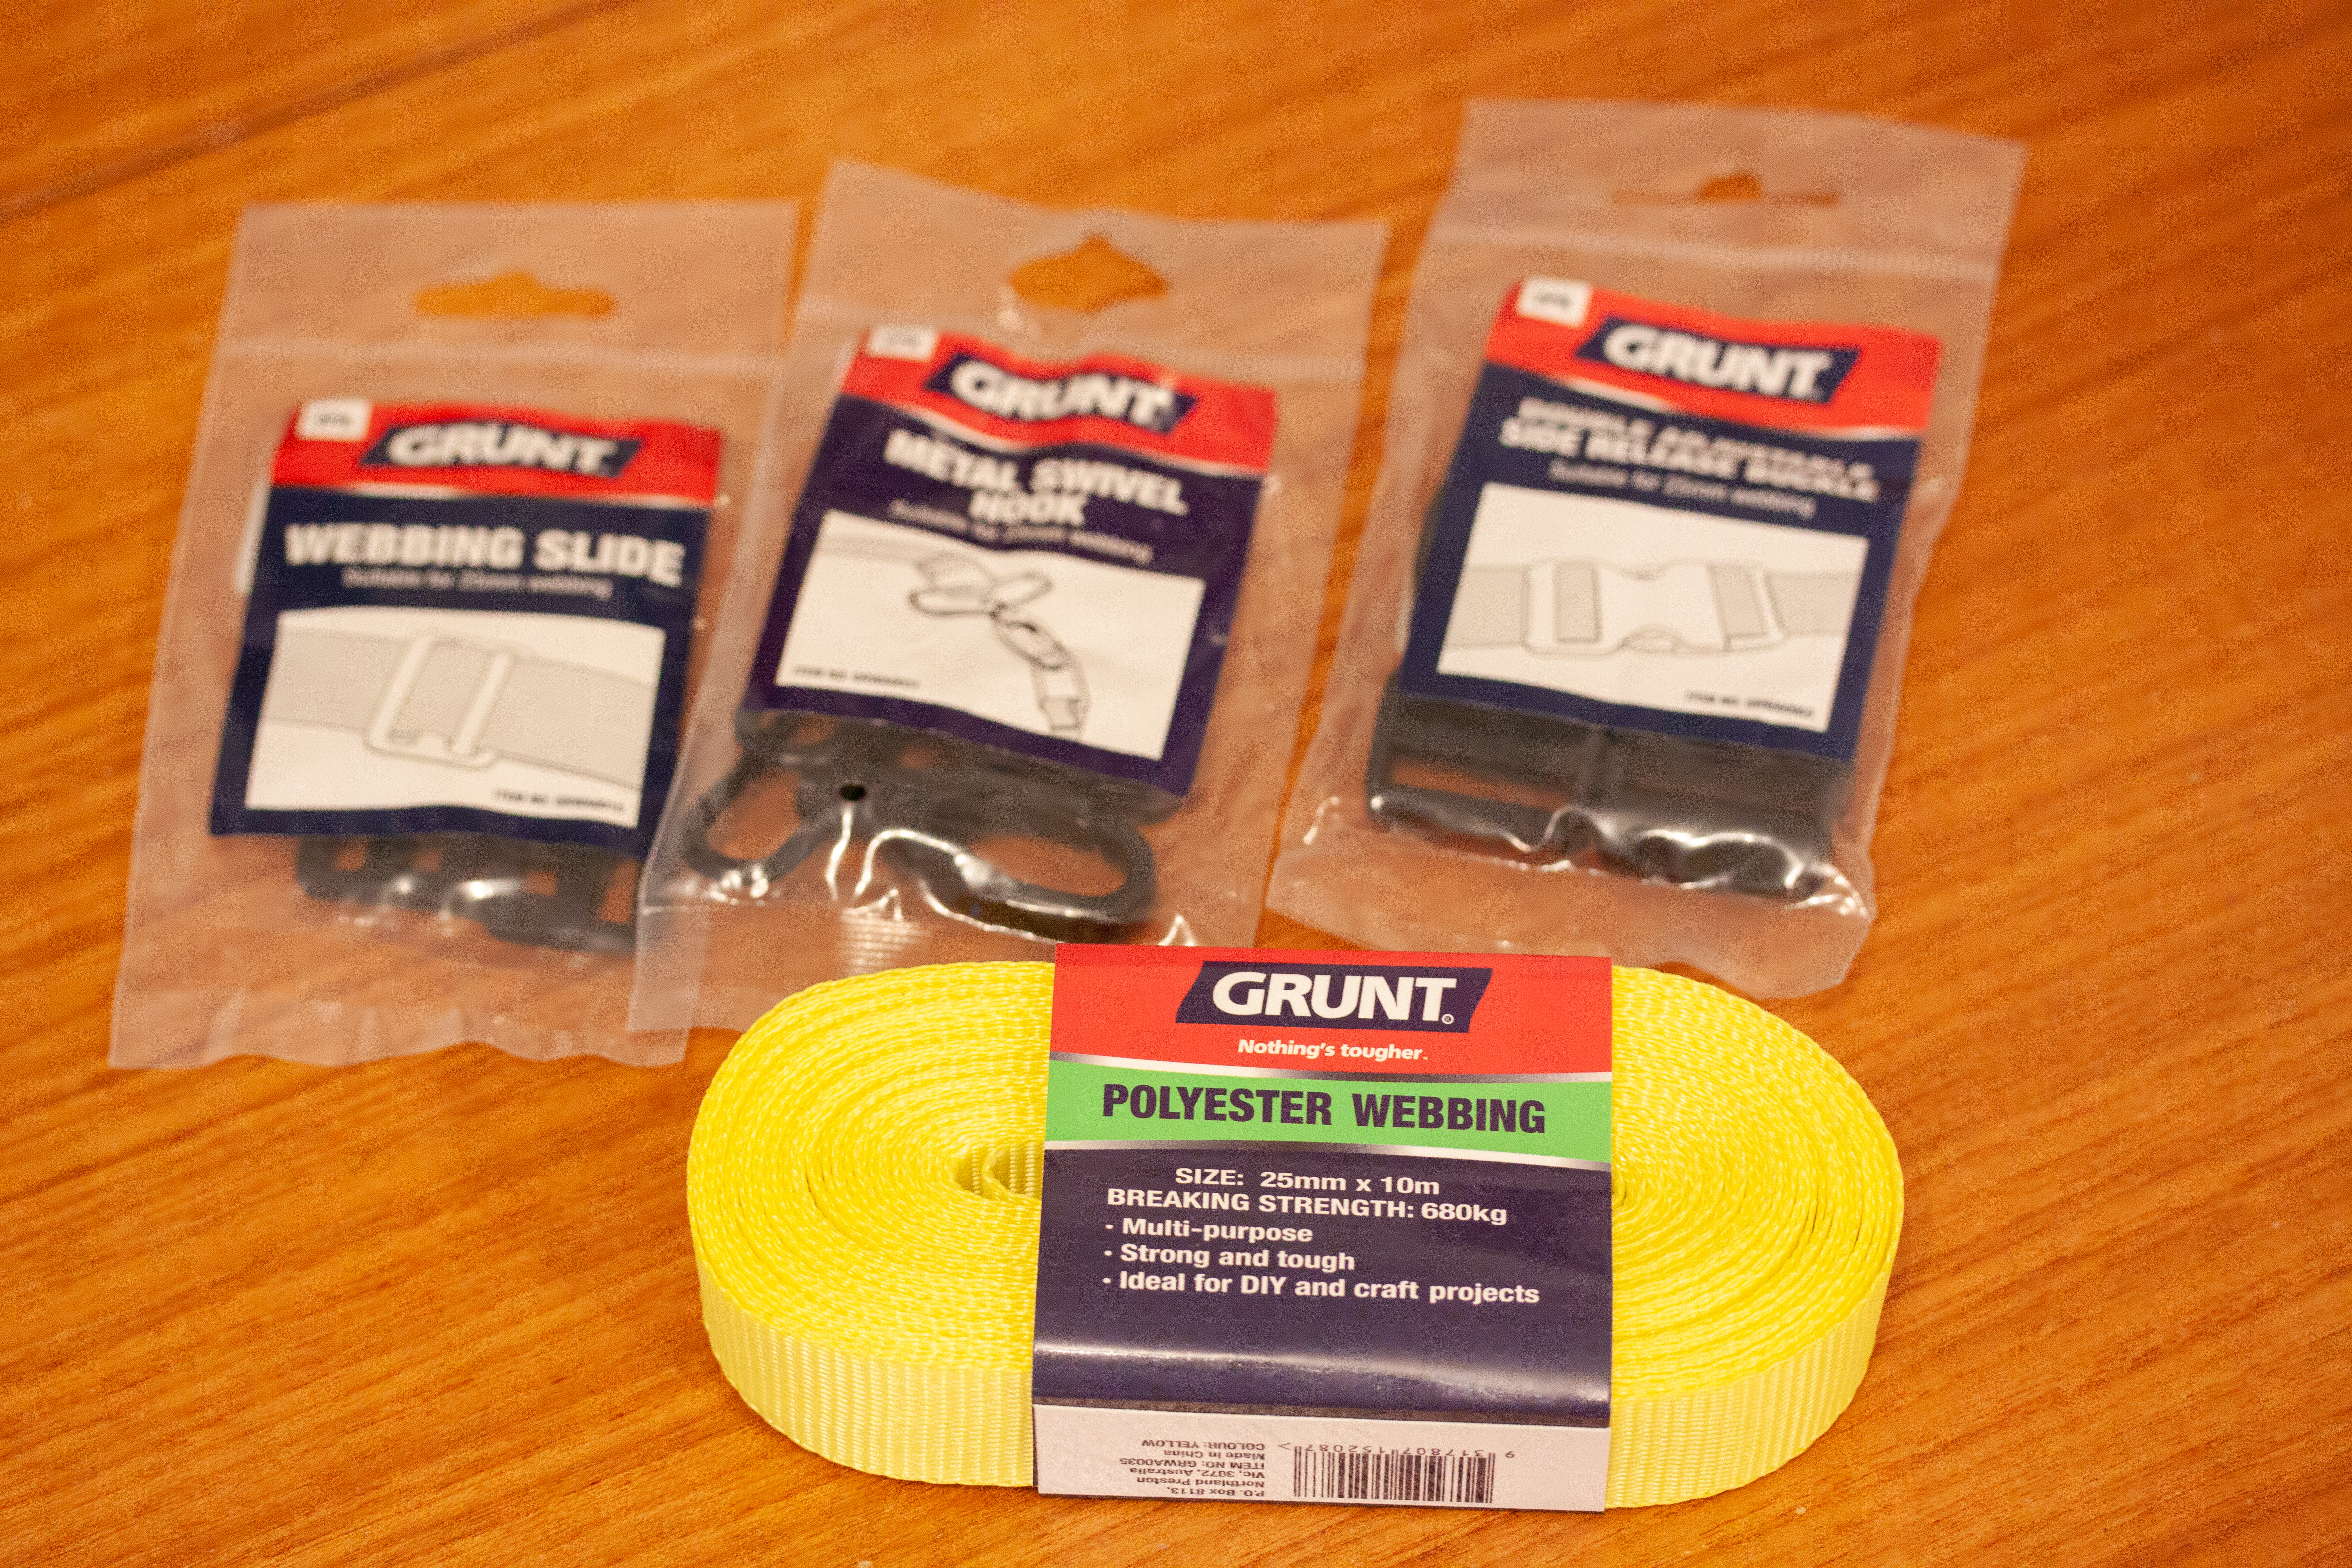
All sorts or accessories were available; clips, swivel shackles, d-rings made form plastic or metal, tensioners and more. I reckon I’ll be using this stuff more in the future.

Continue reading

Ikelite Underwater Camera Housing Overhaul

Having always wanted to take decent (read: macro photos with a digital SLR camera) underwater shots whilst snorkeling and SCUBA diving, I had pined over an underwater housing for my Canon 40D. However, if you’ve ever looked into underwater housings for SLR cameras, you’ll know that they are horrendously expensive ($2500+ at the bottom end of the market)! A new housing can cost as much or more than the camera body itself and that doesn’t include the lens ports which are costly as well.

Secondly, my camera is old (bought in 2007), almost ancient by digital camera standards! So getting a new housing for the camera is impossible because the underwater housing manufacturers make a new housing for the next camera released. No point making housings for old cameras, that’s not where the money is.

I had bought an underwater point and shoot camera (Olympus TG-4) a few years ago to test the waters (note, there’ll be a few intentional and unintentional water related puns in this tale today) and it was OK. It definitely took photos underwater and is a solid piece of gear (I even made a bunch of accessories for it). However, I was never truly satisfied – the photos could be grainy (due to low light and a high ISO), photos were a bit flat (need a powerful flash), focus was difficult and don’t even consider cropping the picture. I wanted to take NatGeo quality photos and that requires a decent camera and decent lenses. Which I already owned. I don’t want to downplay the little point and shoot, it has taken some great photos shown below, however, the success rate is very low, probably 1 in a 100.

Continue reading

F-Clamp Quick Fix

Not really much exciting to report but something nonetheless.

One of my f-clamps kept falling apart whenever I released its tension. I’d back off the handle, and the jaw arm would then drop and slide down the whole length of the bar.

F-clamp that keeps falling apart. There is a linear relationship with my frustration and the number of times its fallen apart.

Continue reading

Plastic Parts Organiser Rack Part 2

Following on from where we last left off, its time to make some shelves for the rack.

Storage shelf sans shelves

The week before I picked up a piece of 7mm plywood from a building scrap supplier just north of Wollongong for $5. The piece was 2400mm long by 500mm wide and was a perfect candidate to cut up into shelf pieces. It was a bit weathered so I gave it a quick sand and then cut it into 200mm wide pieces. I got a bit creative with supporting the piece (the shop vacuum was a near perfect height) as I cut it with the circular saw – probably not the best approach though as it did receive a war-wound.

Continue reading

Plastic Parts Organisers Rack

So, I’ve been on a prolonged mission to get the garage workshop a bit more organised. One thing that had frustrated me was having screws, bolts, nuts etc in small jars and packets in different places. Not knowing what I had caused me to buy doubles of common items and then it was a hassle finding things.

To get sorted, I bought a bunch of plastic organiser trays (they happened to be on a clearance sale so I bought double 🙂 ). Filling all the trays and labeling them all was very therapeutic and has been a huge improvement in itself. However, all the trays are currently sitting on the garage floor 😦 .

Sorting all the small bits and pieces (screws, nails, nuts, bolts, taps, rivets…) into plastic organisers has been great, but having them sit on the floor is a bit silly.

To fix this problem, its time to build a custom shelf with individual trays to slide each organiser into. Also, this was a good opportunity to learn how to use the plunge router I picked up at Dapto Markets (there’ll be plenty of mistakes and misadventures to report about :/ ).

The shelf is essentially a frame with an internal divider and multiple trays.

The sides and bottom of the shelf glued and screwed together. Grooves have already been cut in the sides.

Continue reading

Dapto Market Bargains – 27/1/19

The Dapto Markets are a bit of a favourite of mine. Held weekly, they bring all sorts of people along selling all sorts of wares. My favourite things to look for are used hand tools that are still in good condition or are good quality item/brands that are being sold cheap. Its a cash only affair and sometimes you can get some good deals.

My hands-down favourite and best buy so far would have to be my Hilti rotary hammer drill that I paid $20 for! Assembled in 1985, she’s older than me, but still an absolute brute of a tool. Once you’ve used a rotary-hammer drill you’ll never have the patience for a hammer drill again when drilling into concrete.

Anyway, back on track, this week’s finds include:
*2x bar clamps for $15 each. I found similar new ones at Bunnings for $32 each
*1x Clock – $4
*1x plunge router – $25

Cheap router, dodgy clock and good bar clamps

Continue reading

Weather Station Display


Hey, so its been a while, there’s been a few projects since the last post, but I haven’t written them up 🙄 .

In an effort to stop the projects accumulating in the half-finished pile, I made an effort to take this project that has been sitting on the workbench for ages and put it on display. Its simple enough but I’m pleased with the result.

Ages ago I wrote some code for an HTU21D temperature and humidity sensor. I made an outdoor housing for the sensor and all, and used it for a while, but the display was a bit impractical. Anyway, this time I used a 2 line 20 character VFD (vacuum fluorescent display) I’ve had for years (sitting in the bits and pieces pile) to display the sensor measurements. I’ve always liked the display and now its time to show it off.

Continue reading

3D Resin Casting Electronics – Fails and Wins

For a current project, I needed to cast some electronics in epoxy resin. The process was eventually successful, but it did take 3 attempts to get it right.

Three attempts at casting resin in 3D printed PETG molds.

The aim was to encapsulate a Neopixel ring and control electronics in epoxy and use this as an underwater macro ring light for my underwater camera.

This blog post is just going to detail the process I used and the mistakes made. Once I finish the ring light, I’ll make post about it.

Continue reading